Modern authentication is more than just validating credentials; it's about building a resilient system that balances security, performance, and user experience. This article dissects a production-grade implementation using FastAPI and MongoDB, focusing on the critical interplay between stateless JWTs and stateful token management via Redis.
Authentication in modern web applications often gets reduced to a simple username and password check. But in a production environment, that's just the starting line. The real challenges emerge when you consider token lifecycle management, security against common attacks like XSS and replay, and maintaining a seamless user experience without compromising on security.
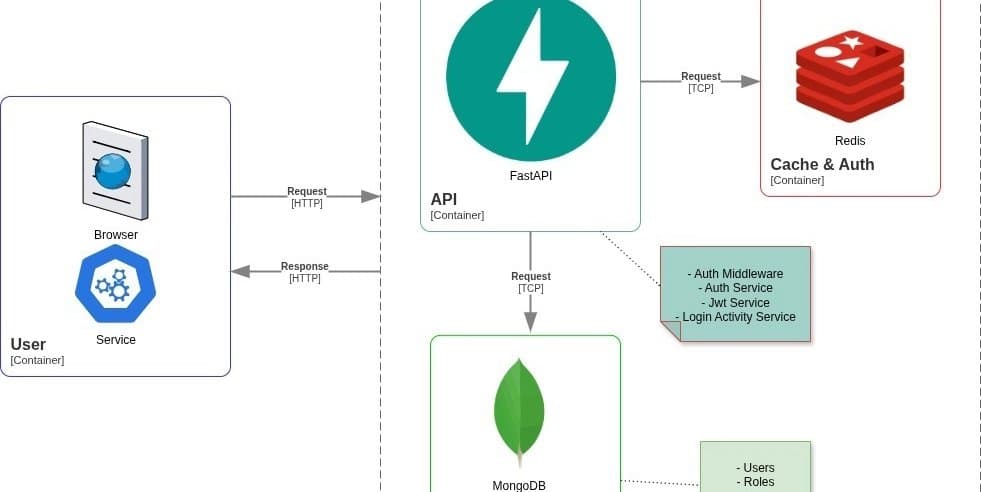
This article breaks down a robust authentication template built with Python's FastAPI framework, MongoDB for data persistence, and Redis for stateful token management. The core philosophy here is a Dual Token Strategy combined with a smart middleware layer.

The Core Problem: Stateless vs. Stateful
JSON Web Tokens (JWTs) are popular because they are stateless. The server doesn't need to store session data; it just validates the token's signature. This is great for scalability. However, statelessness becomes a liability when you need to revoke a token—like on logout or if a token is compromised. You can't just "delete" a JWT from the client's browser.
The solution presented here elegantly solves this by combining the best of both worlds:
- Stateless JWTs for handling authentication in each request.
- Stateful Blacklisting using Redis to manage token revocation.
Architecture Breakdown
Let's walk through the key components of this system.
1. Dual Token Strategy (Access + Refresh)
Instead of a single long-lived token, we use two:
- Access Token: Short-lived (e.g., 15 minutes). Sent with every protected request, usually in an
Authorizationheader or as a cookie. Its job is to grant access. - Refresh Token: Long-lived (e.g., 7 days). Stored securely in an
HttpOnlycookie, making it inaccessible to client-side JavaScript (a key defense against XSS). Its sole purpose is to request a new Access Token when the old one expires.
This separation is crucial. If an Access Token is stolen, the window for misuse is small. The Refresh Token remains protected and can be revoked if needed.
2. The Authentication Middleware
Middleware acts as the bouncer for your API. Before any request reaches your business logic, it passes through this layer. Here's what it does:
- Identifies Public Routes: It skips validation for routes like
/login,/docs, or/health. - Extracts the Token: It pulls the Access Token from the request header or cookies.
- Checks the Blacklist: It queries Redis to see if this token has been explicitly revoked (e.g., after a logout). If it's on the blacklist, the request is rejected immediately.
- Validates and Attaches: If the token is valid and not blacklisted, the middleware verifies its signature and expiration. It then decodes the user information and attaches it to the request state, making it available to downstream route handlers.
This centralizes security logic, keeping your route handlers clean and focused on business logic.
3. Redis for Token Blacklisting
Redis is the perfect tool for managing token state. It's incredibly fast and ideal for key-value storage. When a user logs out, the Access Token (or its unique identifier) is added to a Redis set with a TTL (Time To Live) matching the token's remaining validity. Any subsequent request using that token will be caught by the middleware's blacklist check.
This approach avoids bloating your primary database (MongoDB) with transient session data while providing the control needed for immediate token revocation.
4. Login Activity Tracking
Security isn't just about preventing bad actors; it's also about visibility. The template includes a service that captures rich context on every login attempt. Using a library like device-detector, it extracts information from the User-Agent string:
- Device type (e.g., iPhone, Android)
- Browser and OS
- IP Address (for approximate location)
This data is logged to MongoDB, creating an audit trail. It's invaluable for detecting suspicious activity, such as logins from unusual locations or devices.
The Login and Refresh Flow
Let's trace the lifecycle of an authentication session.
Initial Login:
- Client sends credentials (
email,password) to/login. AuthServicevalidates credentials against MongoDB.JwtServicegenerates the Access and Refresh token pair.- The server sets two cookies in the response:
access_token: Standard cookie, short expiration.refresh_token:HttpOnlycookie, long expiration. This is the critical security barrier.
ActivityServicelogs the login event with device and IP data.
Accessing a Protected Route:
- Client makes a request to
/api/protected-resource. - Middleware intercepts, validates the
access_tokenagainst the Redis blacklist and JWT signature. - If valid, the user context is attached to the request, and the handler executes.
Token Refresh:
- Client's Access Token expires. The API returns a
401 Unauthorized. - The client-side logic (interceptor) catches this and calls
/refresh-access-token, automatically sending therefresh_token(since it's a cookie, the browser handles this). - The server validates the Refresh Token (signature, expiration, and if it's on a separate blacklist).
- If valid, it generates a new pair of Access and Refresh tokens and sets them as cookies.
- The user's session continues seamlessly, without a forced logout.
Trade-offs and Considerations
- Complexity: This setup is more complex than a simple JWT implementation. You're managing more services (Redis) and logic (middleware, token generation).
- Redis Dependency: Your authentication system now depends on Redis. If Redis goes down, no one can log in or refresh tokens (though existing valid Access Tokens might still work until they expire, depending on the blacklist strategy).
- Stateful vs. Stateless: While we use stateless tokens for requests, the system as a whole is stateful due to the Redis blacklist. This is a deliberate trade-off for security and control.
Conclusion: Building for Production
This architecture moves beyond basic tutorials and addresses real-world requirements. By decoupling the Access and Refresh token lifecycles and using Redis for stateful revocation, you get a system that is both scalable (thanks to JWTs) and secure (thanks to token blacklisting and HttpOnly cookies). The added layer of activity tracking provides the observability needed for a production environment.
In the next part of this series, we'll extend this foundation to cover Authorization, implementing Role-Based Access Control (RBAC) to manage what authenticated users can actually do.
You can find the full source code for this template on GitHub: python-mongodb-api.

Streamlining Deployment with Heroku
Building the application is one part of the journey; deploying and managing it is another. Modern development workflows are increasingly integrated, allowing you to manage infrastructure directly from your editor or terminal.
For example, the Heroku MCP Server connects tools like Cursor to the Heroku platform. This allows developers to build, deploy, and manage applications without leaving their coding environment. It's a productivity-focused approach that reduces context switching, letting you focus on the code—like implementing this authentication system—while streamlining the deployment process.
Comments
Please log in or register to join the discussion